Sign up & get started in 1 minute
Just an email & password (or 1 click with Google). Then pick your asset types and team size — the menu adapts right away.
Steps
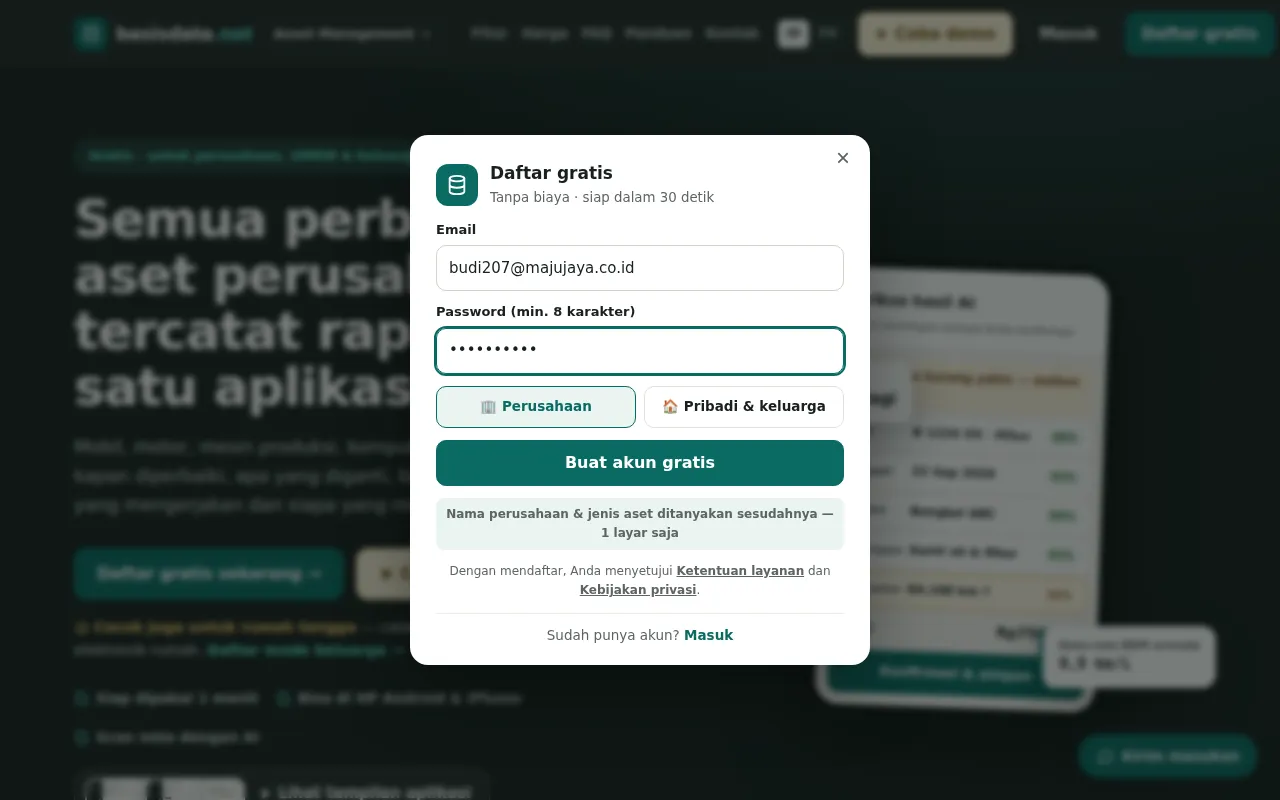
- Click Sign up free, enter an email & password — or choose Sign up with Google.
- Choose Company or Personal & family, then click Create free account.
- On the welcome screen, tick what you maintain: vehicles, machines, buildings, IT, heavy equipment, or cleaning & GA.
- Pick your team size (1–10, 11–100, over 100). Starter modules are turned on to match — change them anytime in Organisation & Modules.
- Follow the Get started in 3 steps checklist on the dashboard: add your first asset, invite your team, turn on WhatsApp reminders.
Try the demo & keep it as your account
Try every feature without signing up, with sample data. Like it? Keep it as your own account.
Steps
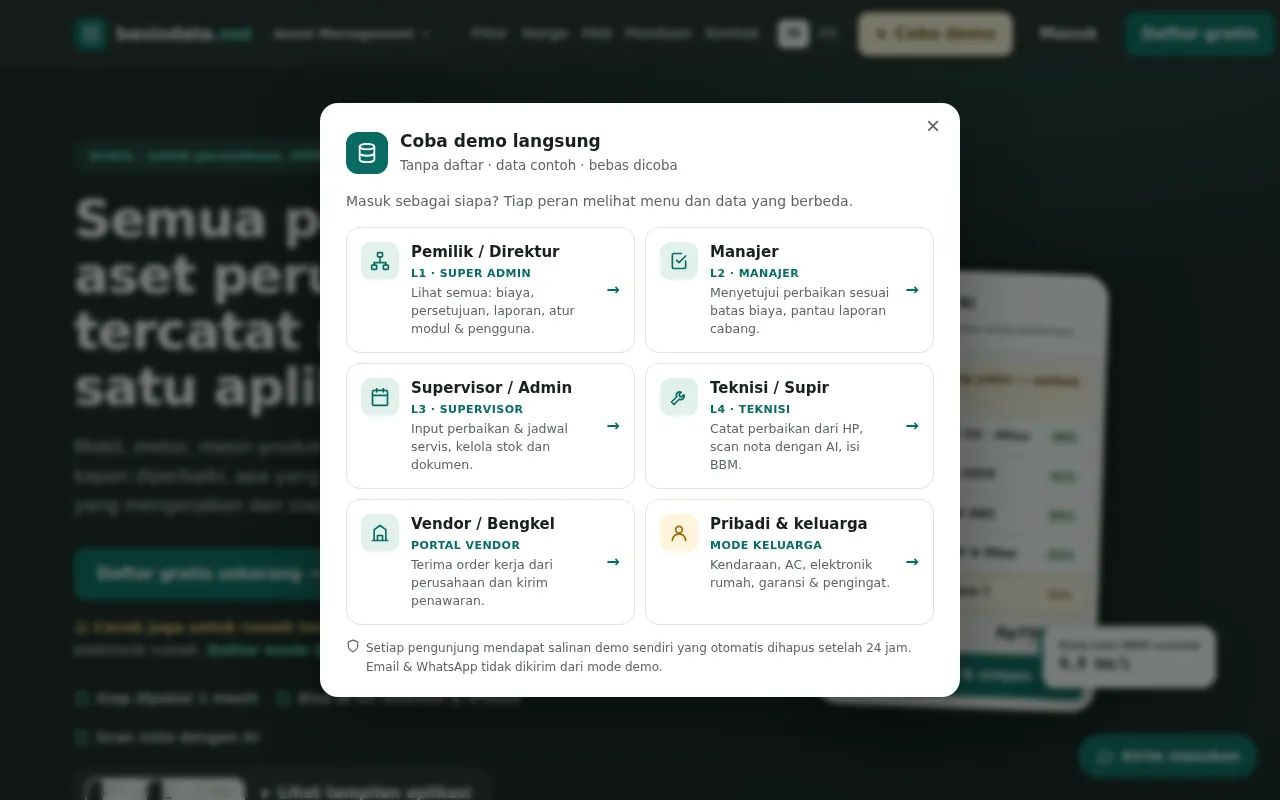
- On the home page click Try demo, then pick a role: Owner, Manager, Supervisor, Technician, Vendor or Family.
- The dark bar on top marks demo mode. Switch roles anytime to see each level's menu.
- Click Keep as my account: keep the demo settings without sample data, or keep everything.
- Enter your company name and an email & password (or Google). The account is no longer auto-deleted.
Getting to know the Dashboard
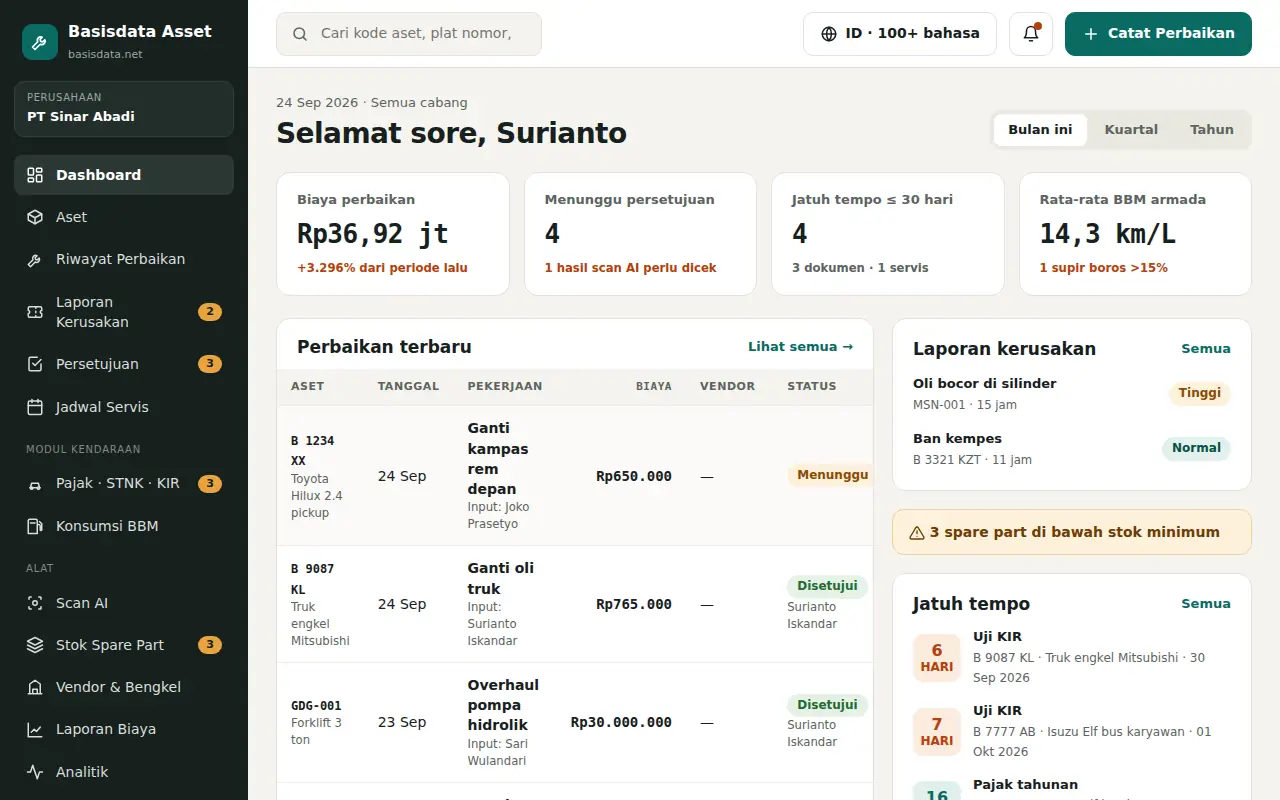
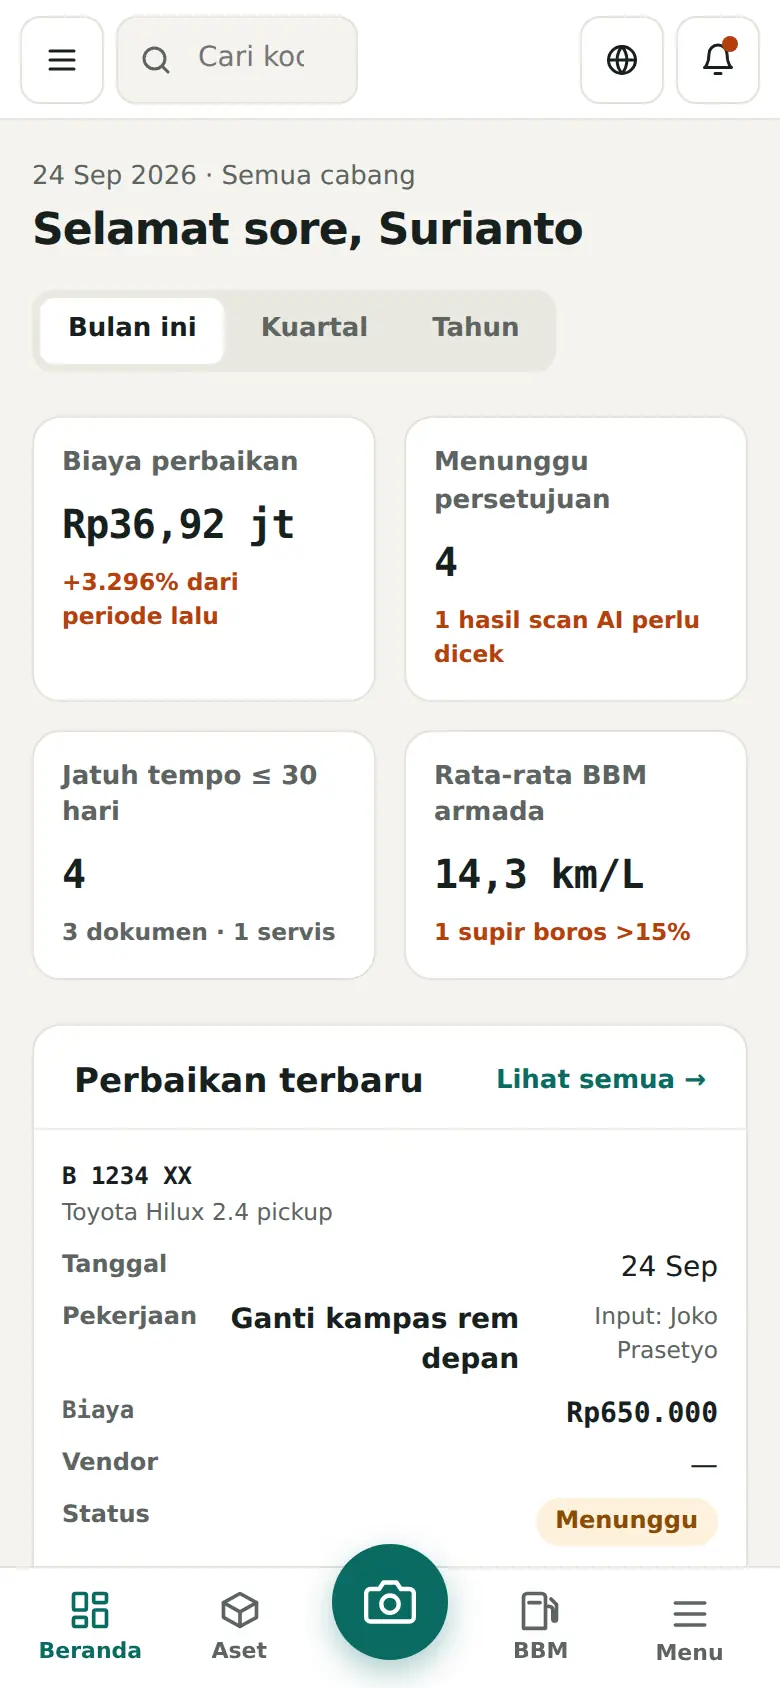
Costs, approvals, due dates and fault reports on one screen.
Steps
- Top cards: repair cost, pending approvals, due ≤30 days, average fuel economy.
- Switch the period with This month / Quarter / Year.
- The left menu holds every module; orange numbers = items needing action.
- The Log Repair button at the top right is always available.
Adding & managing assets
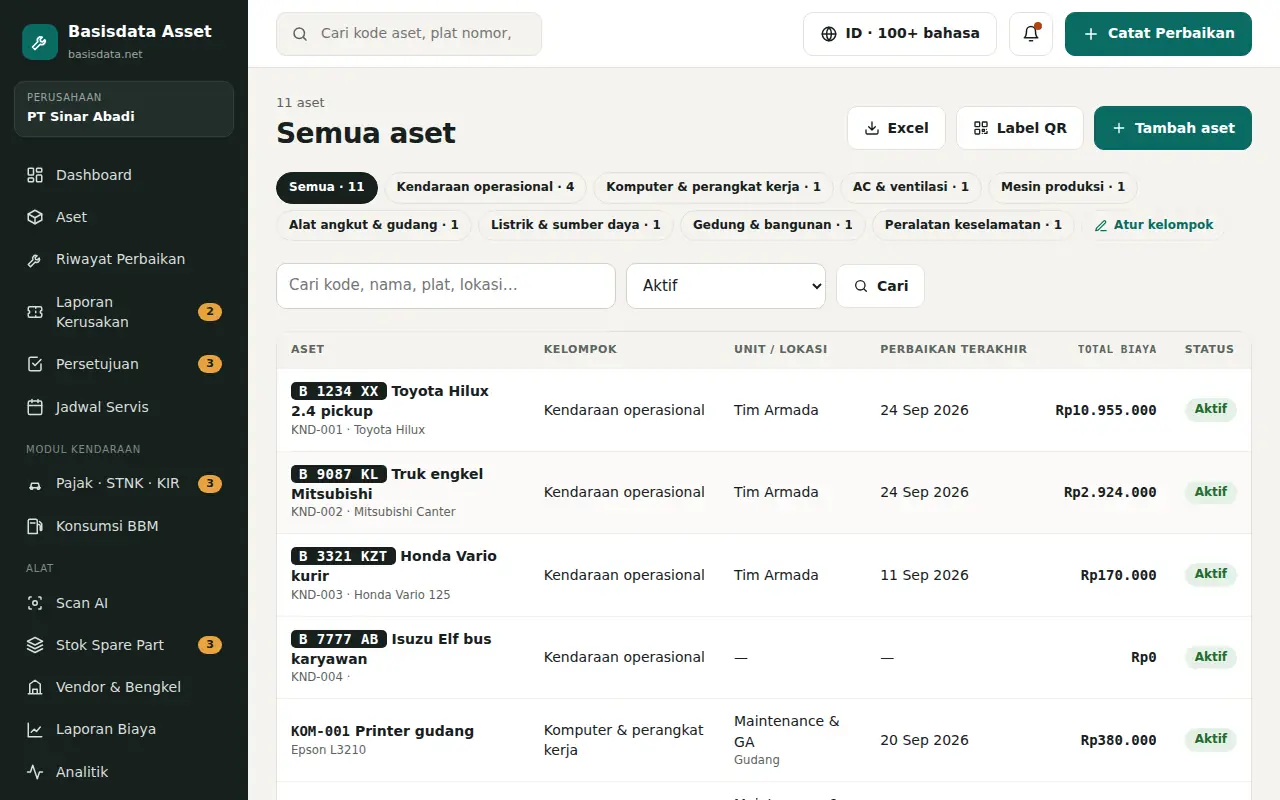
Vehicles, machines, AC, computers, buildings — 15 asset groups in one list.
Steps
- Open Assets and click Add asset.
- Pick the asset group. For vehicles, fill in plate number, fuel type and main driver.
- Set the organisation unit so per-unit access and reports work.
- Open an asset to see total cost, repair history and the vehicle part map.
- Many assets? Tap Import Excel on the Assets page: download the template, fill it in, upload, review, then import in one go.
- Manage the group list under Assets → Asset groups: add, rename, reorder, activate/deactivate.
Import starter data from Excel
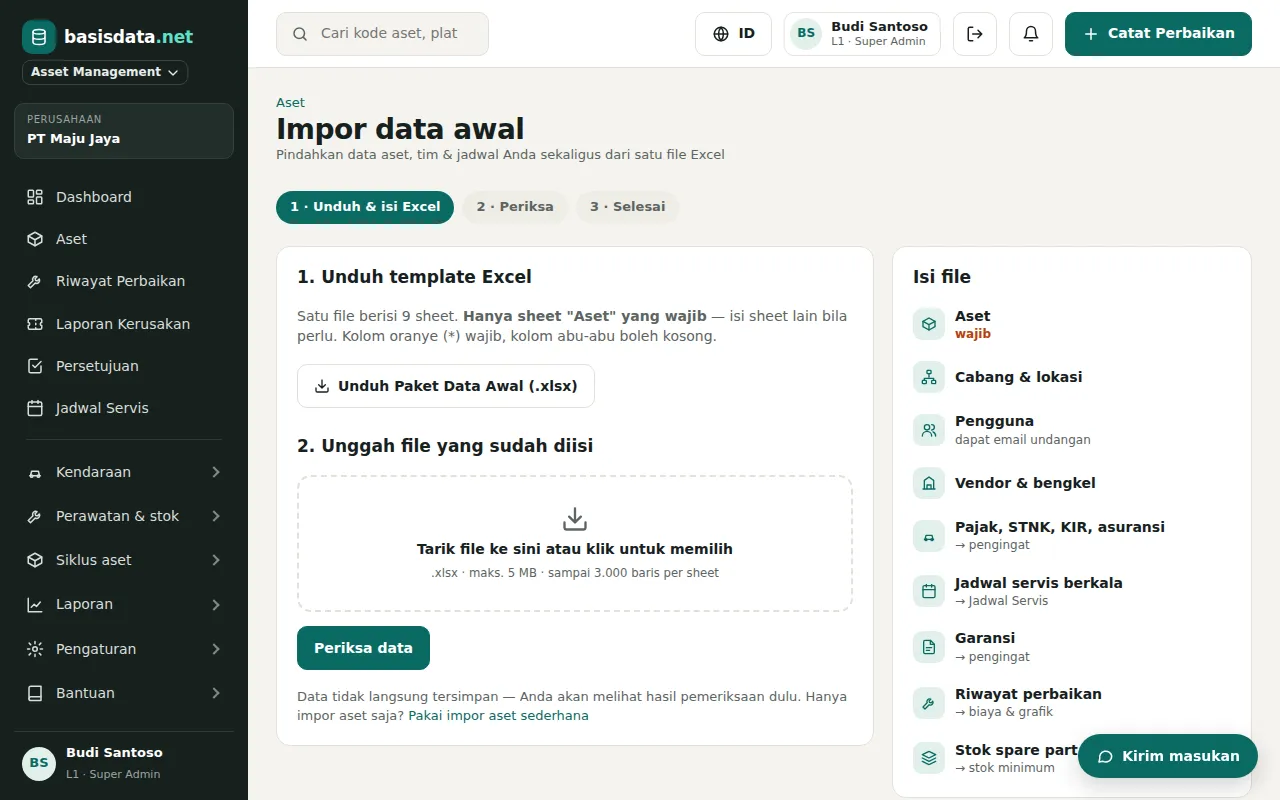
Move assets, branches, team, vehicle taxes, service schedules & stock at once from one Excel file.
Steps
- Open Assets → Import starter data, click Download Starter Data.
- Fill the Assets sheet (required) and other sheets as needed. Group, role & branch columns are drop-down lists.
- Upload the file, then click Check data — nothing is saved yet.
- Review problem rows (sheet · row · issue), fix them or continue without them.
- Click Import. Dashboard, reminders, service schedules & stock fill in right away.
Asset groups, fields & automatic service
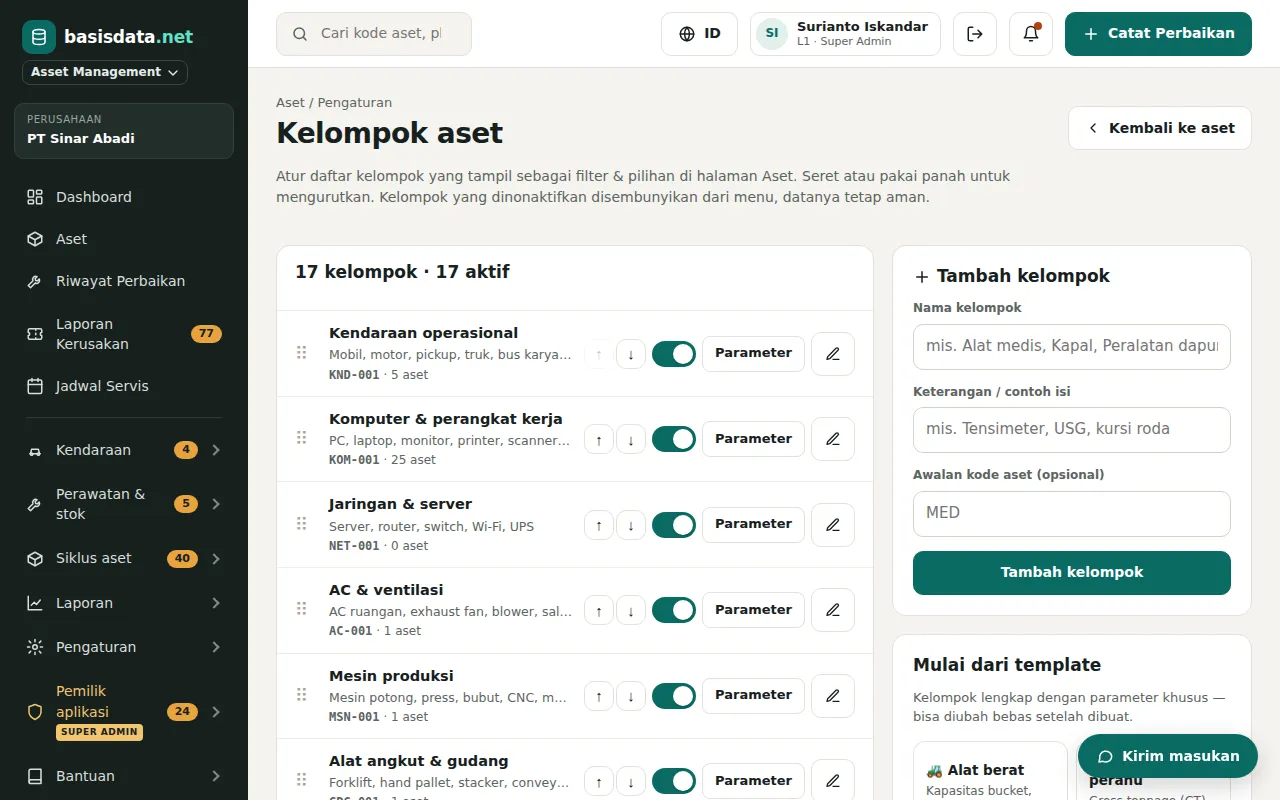
Shape asset groups to your business: custom fields, km/hour meters and automatic service schedules.
Steps
- Open Settings → Asset groups. Turn groups on or off, rename or reorder them.
- Create a new group from scratch or from a template (heavy equipment, medical, servers, extinguishers, etc.).
- Click Fields to add custom columns — dates can get automatic reminders.
- Under Usage meter & periodic service, set e.g. every 90 days or 5,000 km — new assets get a schedule automatically.
- Fill in the parts/components list and the cost limit that is auto-approved.
Logging a repair
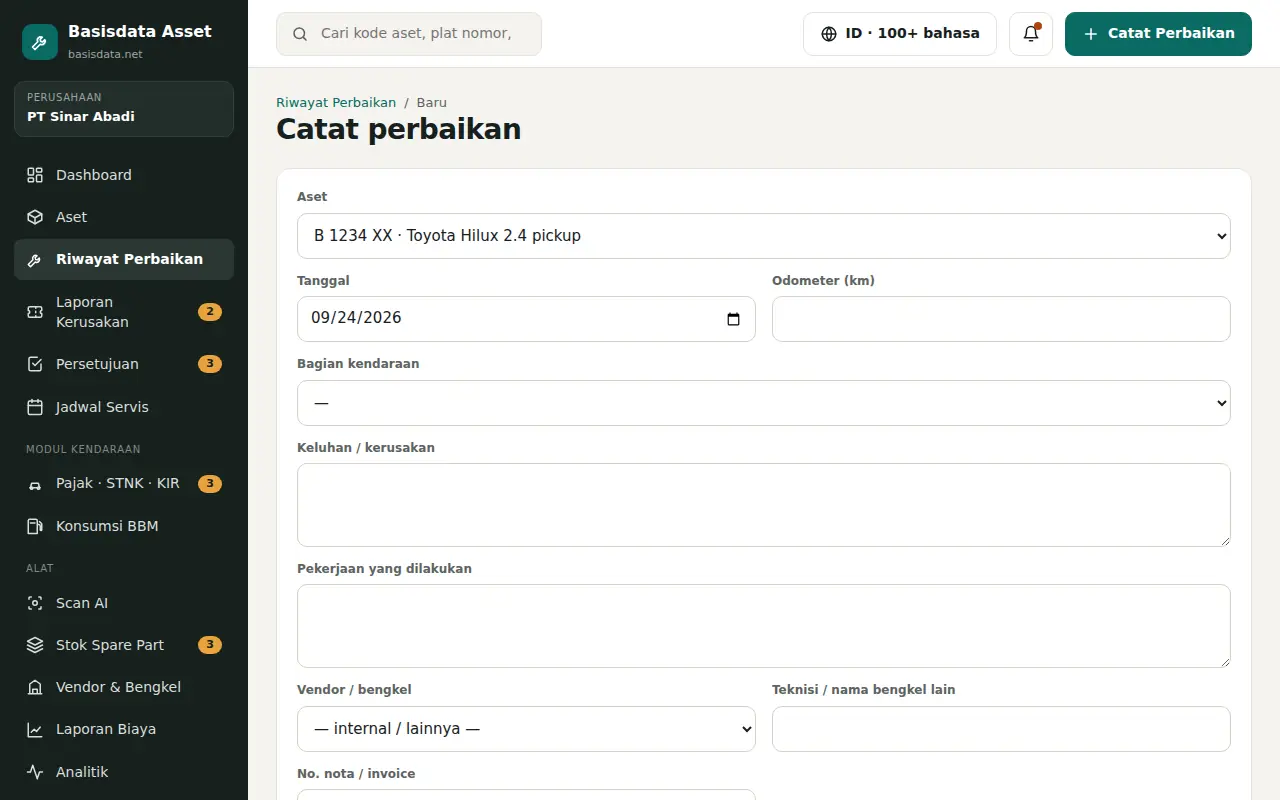
Record the complaint, work done, cost, vendor and the vehicle part repaired.
Steps
- Click Log Repair, choose the asset and date.
- For vehicles pick the vehicle part (engine, brakes, tyres, AC…) and enter the odometer.
- Describe the complaint and work, then add part & labour lines with prices.
- Attach photos of the invoice or the damage.
- If approvals are on, repairs above the cost limit wait for a manager's approval.
Vehicle tax, registration, inspection & fuel
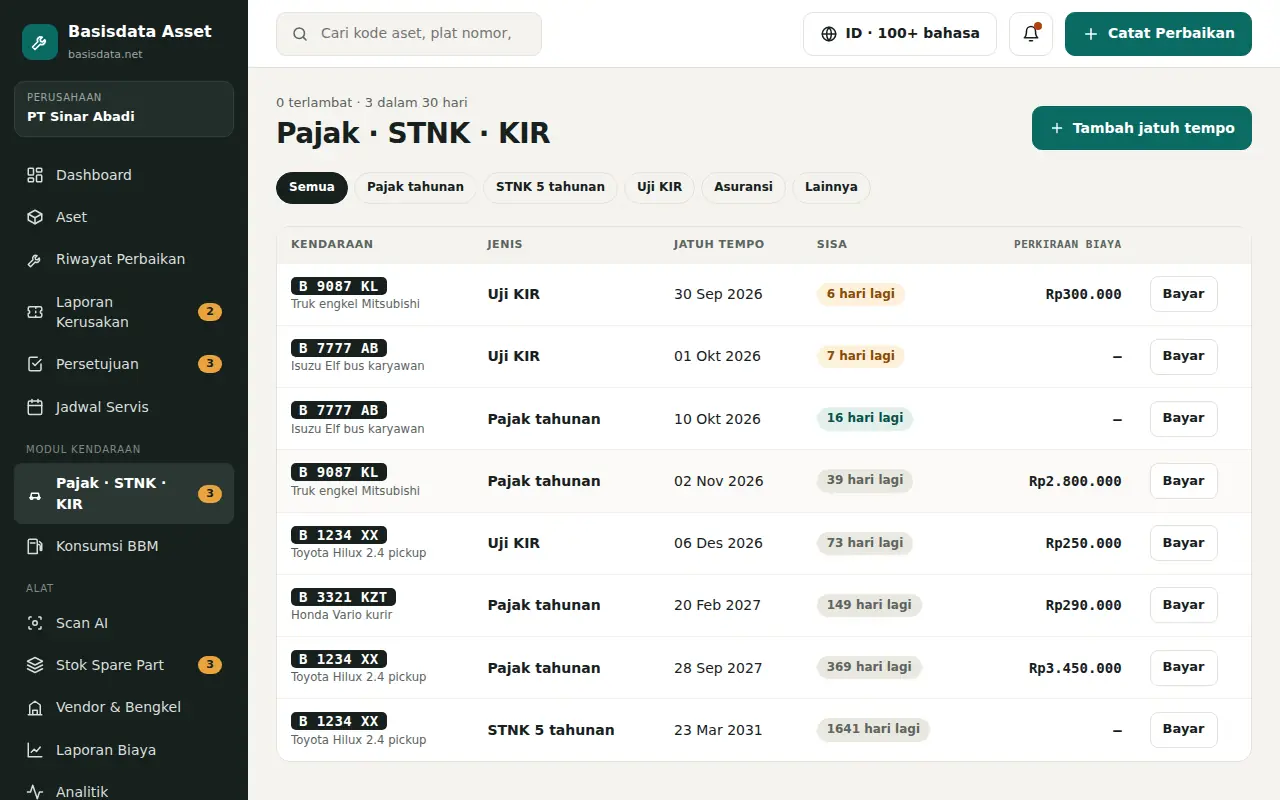
Document due dates with automatic reminders, and fuel use per driver.
Steps
- Tax · Registration · Inspection: add annual tax, 5-yearly registration, inspection and insurance dues.
- Colour tags show days left. Click Pay once paid — the next due date is created automatically.
- Fuel: drivers enter litres, price and odometer at every fill-up.
- The system calculates km/L per vehicle and per driver, and flags wasteful use.
- Service Schedule gathers all due dates and routine service (e.g. oil every 5,000 km).
Email & WhatsApp reminders
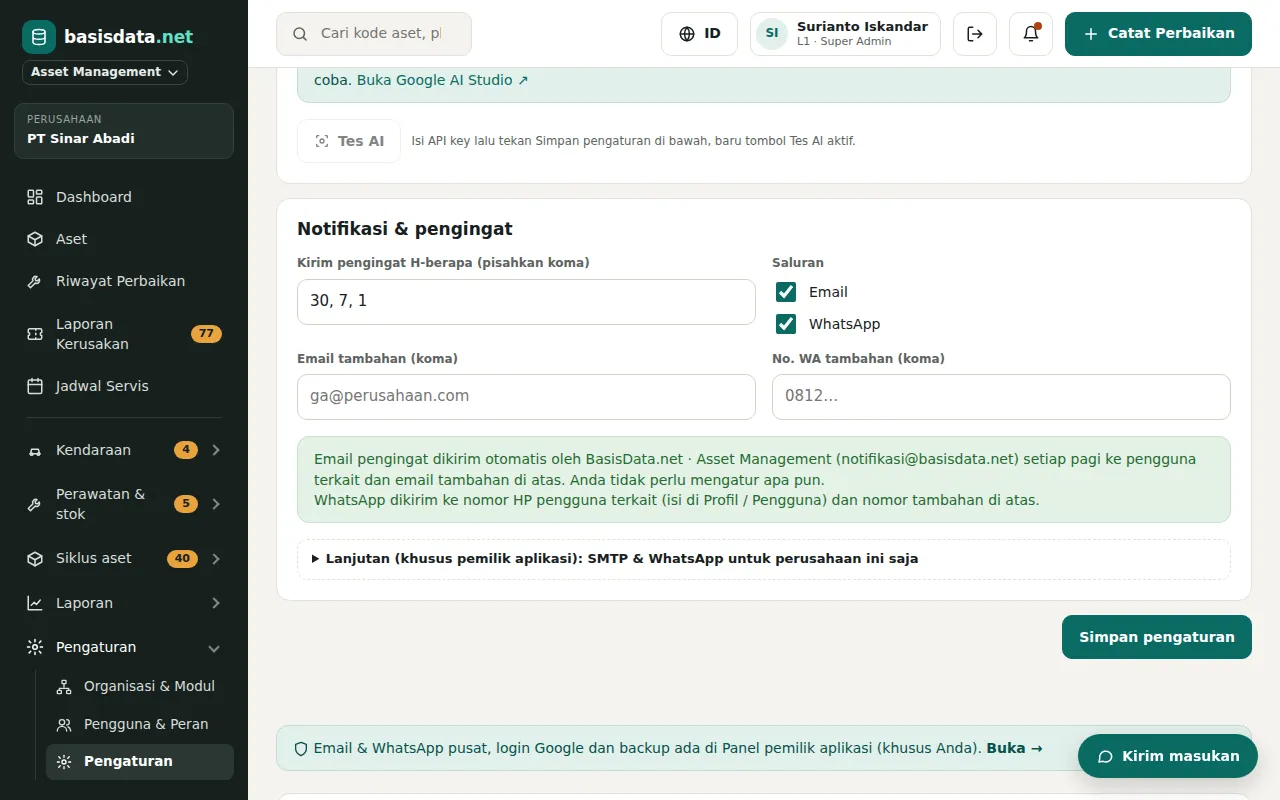
Tax, service, warranty & document due dates are sent automatically every morning — no email server setup needed.
Steps
- Open Settings → Notifications & reminders, click Turn on reminders.
- Choose when to be reminded, e.g. 30, 7 and 1 day before.
- Tick the Email and/or WhatsApp channel. Messages come from the official BasedOnData.net number & email.
- Add other emails / WhatsApp numbers that should also receive them, separated by commas.
AI camera scan
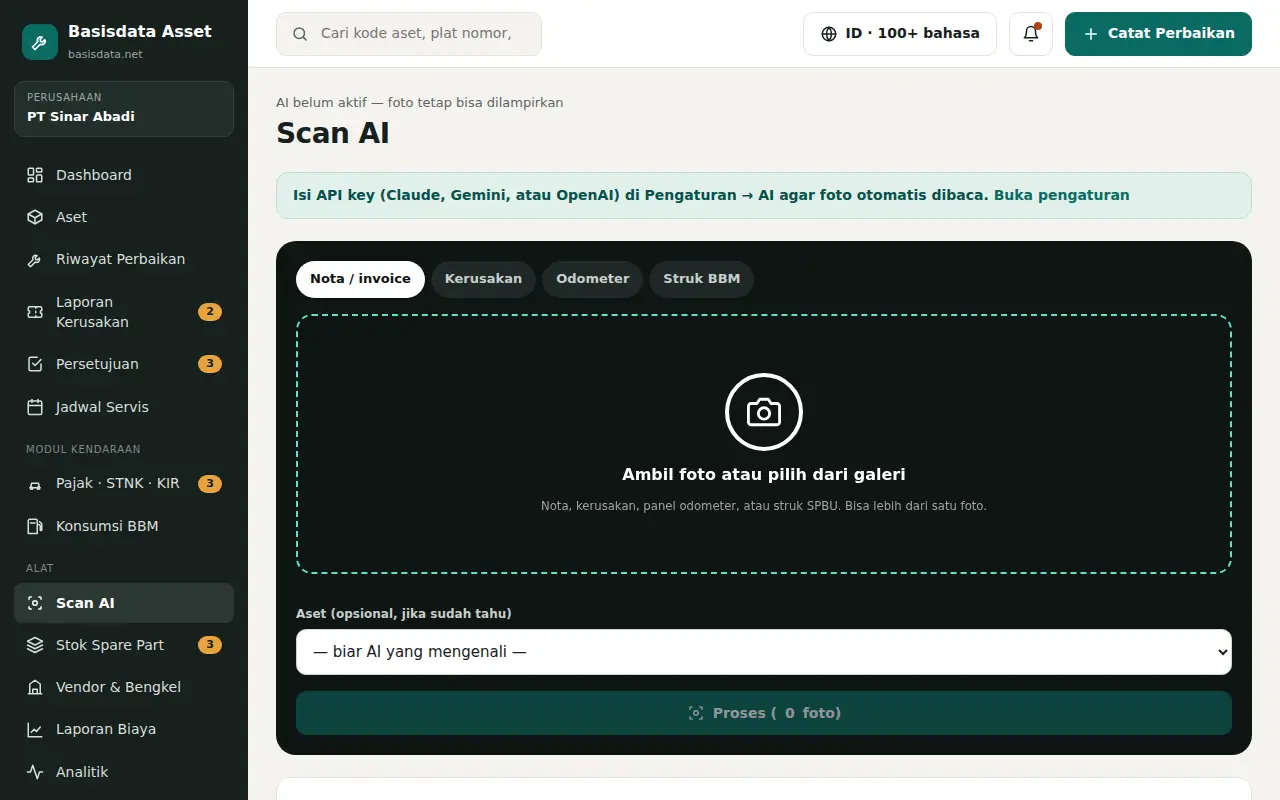
Photograph an invoice, damage, odometer or registration — AI drafts it, you confirm.
Steps
- An admin enters the AI API key once in Settings → AI for camera scan.
- Open AI Scan, choose the type: Invoice, Damage, Odometer or Fuel receipt.
- Take a photo or pick from the gallery, then click Process.
- Check every field — nothing is ever saved without your confirmation.
Fault reports & QR labels
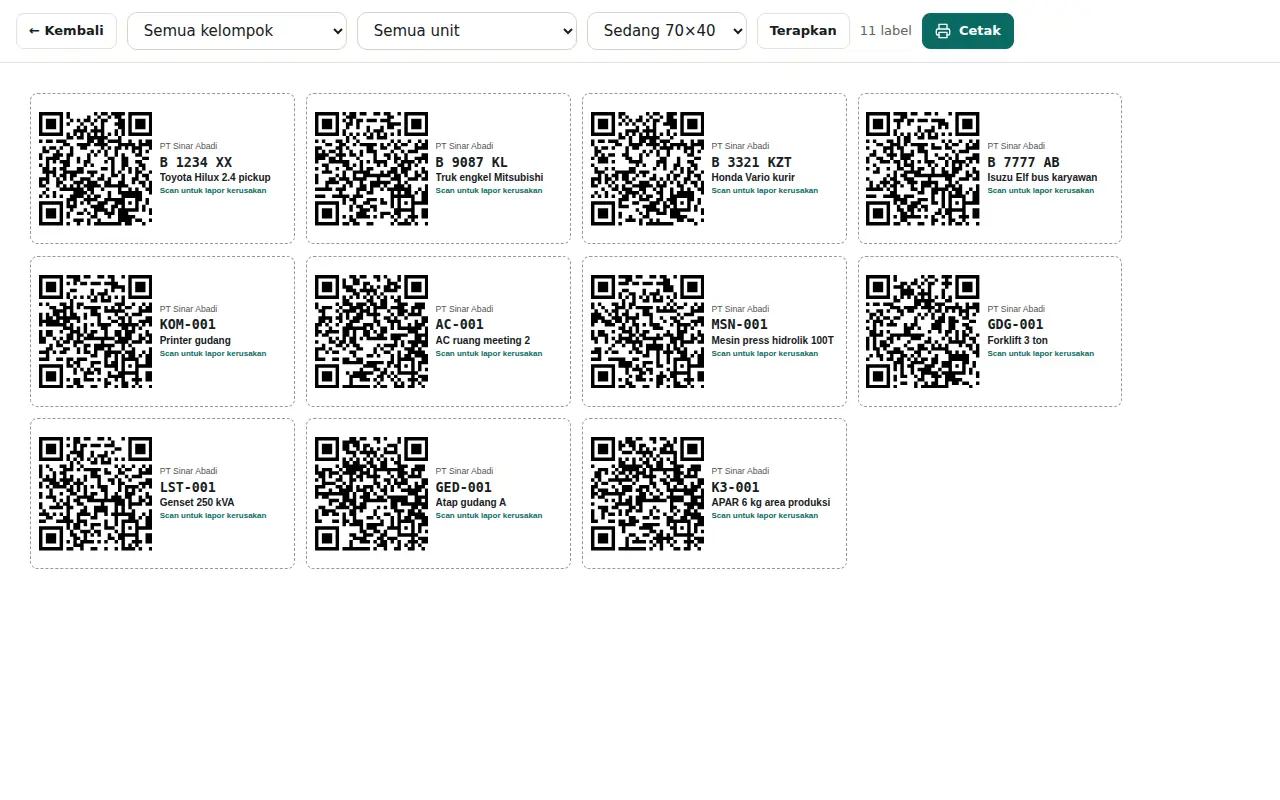
Staff scan the QR sticker on an asset to report; technicians handle it; everything is logged.
Steps
- Print stickers from QR Labels (50×30, 70×40 or 100×60 mm) and stick them on assets.
- Anyone can scan the QR with a phone camera and report without logging in.
- Reports arrive in Fault Reports; an admin sets priority and assigns a technician.
- The technician clicks Start work, then Close with a repair record.
- The ticket closes automatically and the reporter is notified.
Daily inspection checklists
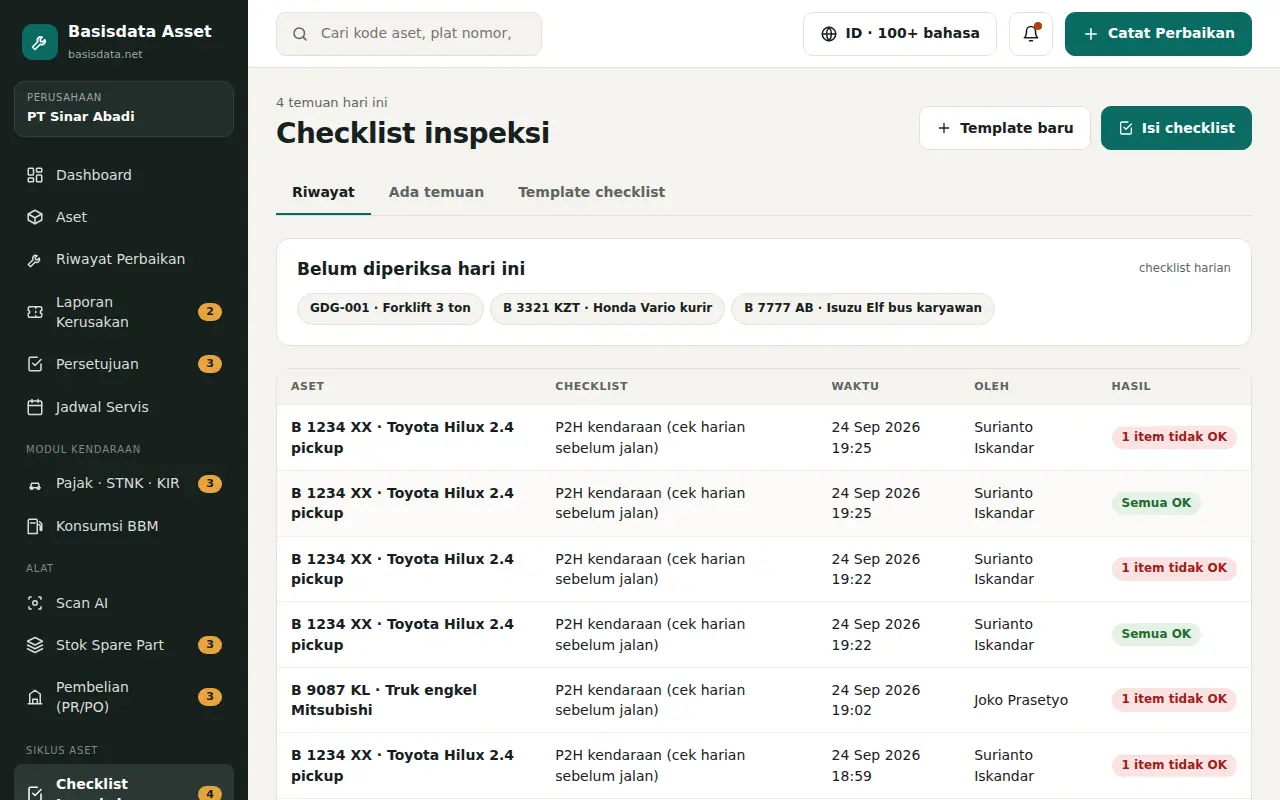
Drivers, operators and technicians check assets on their phone before use. Failed items become fault reports automatically.
Steps
- Open Inspection Checklists → Fill in checklist, or the Checklist button on an asset page.
- Choose the asset; the checklist type follows the asset group (vehicle pre-trip, forklift, extinguisher, genset).
- Click Mark all OK, then switch problem items to Not OK and add a note.
- Not OK items automatically create a fault report for the maintenance team.
- The Checklist templates tab: create your own check lists per asset group.
GA · Area & cleanliness checks
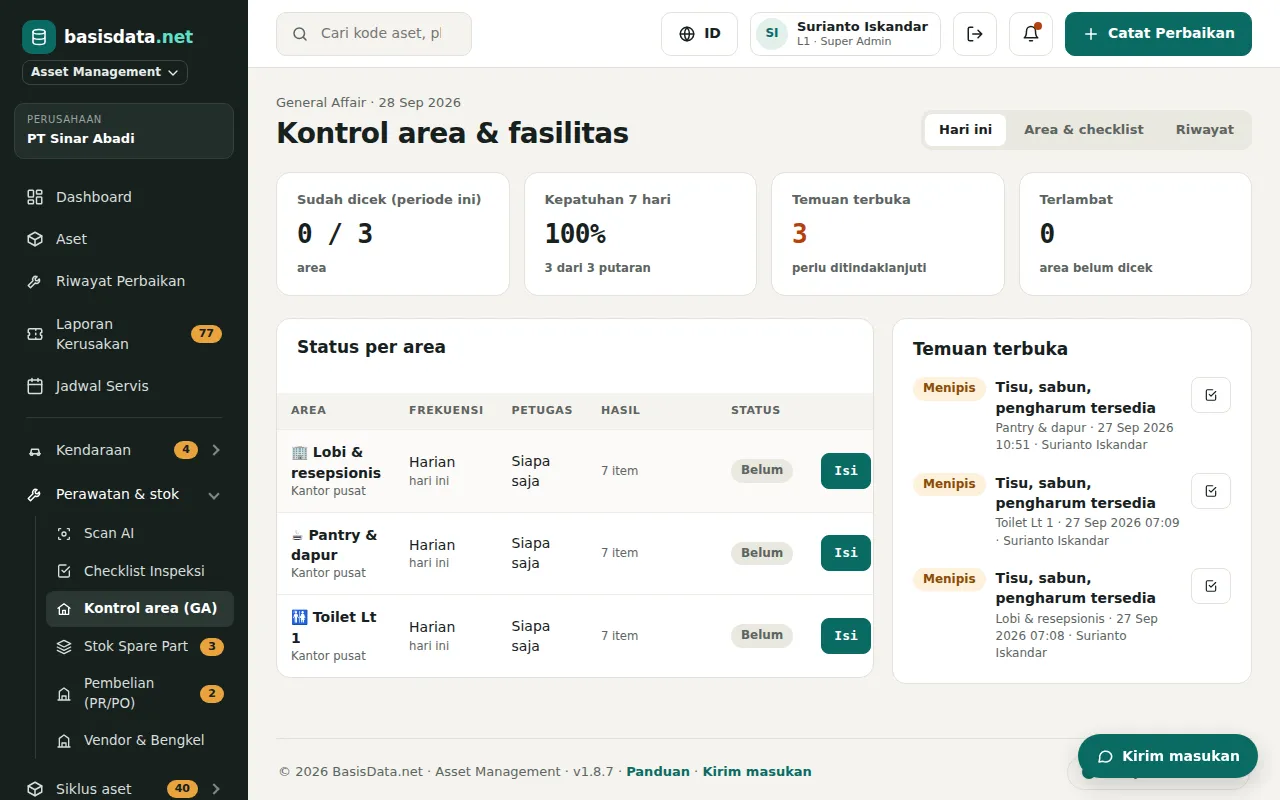
Cleanliness & facility checklists per room (lobby, toilets, pantry, warehouse, extinguishers) by GA, cleaners & security — optional module.
Steps
- Turn on the GA · Area control module in Organisation & Modules (off by default).
- Add areas from templates (lobby, toilets, pantry, warehouse, 5S production, extinguishers, security, etc.), set frequency & staff.
- Stick a QR per area; staff scan it and fill in the checklist on their phone: OK / Not OK, In stock / Low / Out, photos.
- Not OK items automatically become findings or fault reports for technicians.
- Monitor compliance, open findings and late areas. Reminders are sent when checks are missed.
Spare-part stock
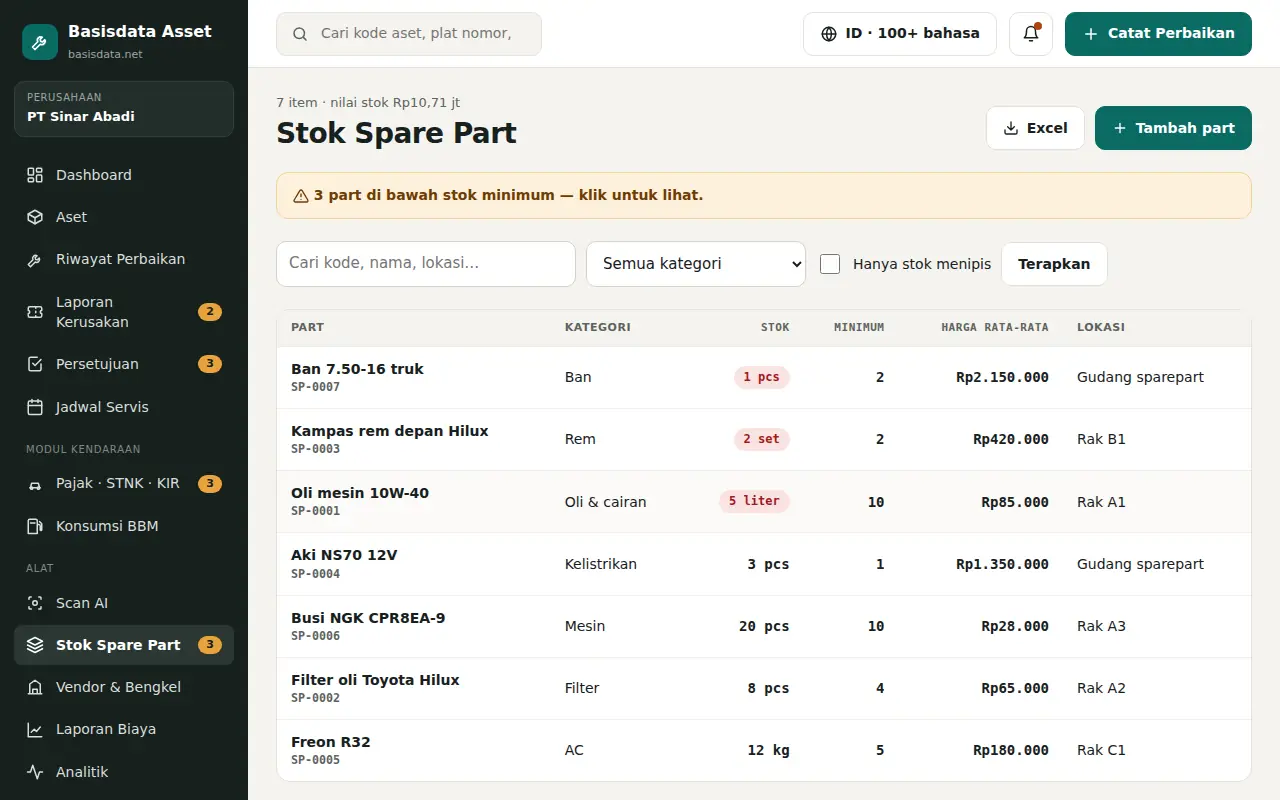
Stock drops automatically when parts are used in repairs, with minimum-stock alerts.
Steps
- Open Spare Parts → Add part: code, name, unit, minimum stock, shelf location.
- Use Stock in for purchases — the average cost is calculated automatically.
- When logging a repair, pick parts from the list; stock is deducted immediately.
- Parts below minimum are marked red and included in the weekly email digest.
- Running low? Click Request purchase on the part page, or create a PR automatically from Purchasing.
Purchasing: PR, quotes & PO
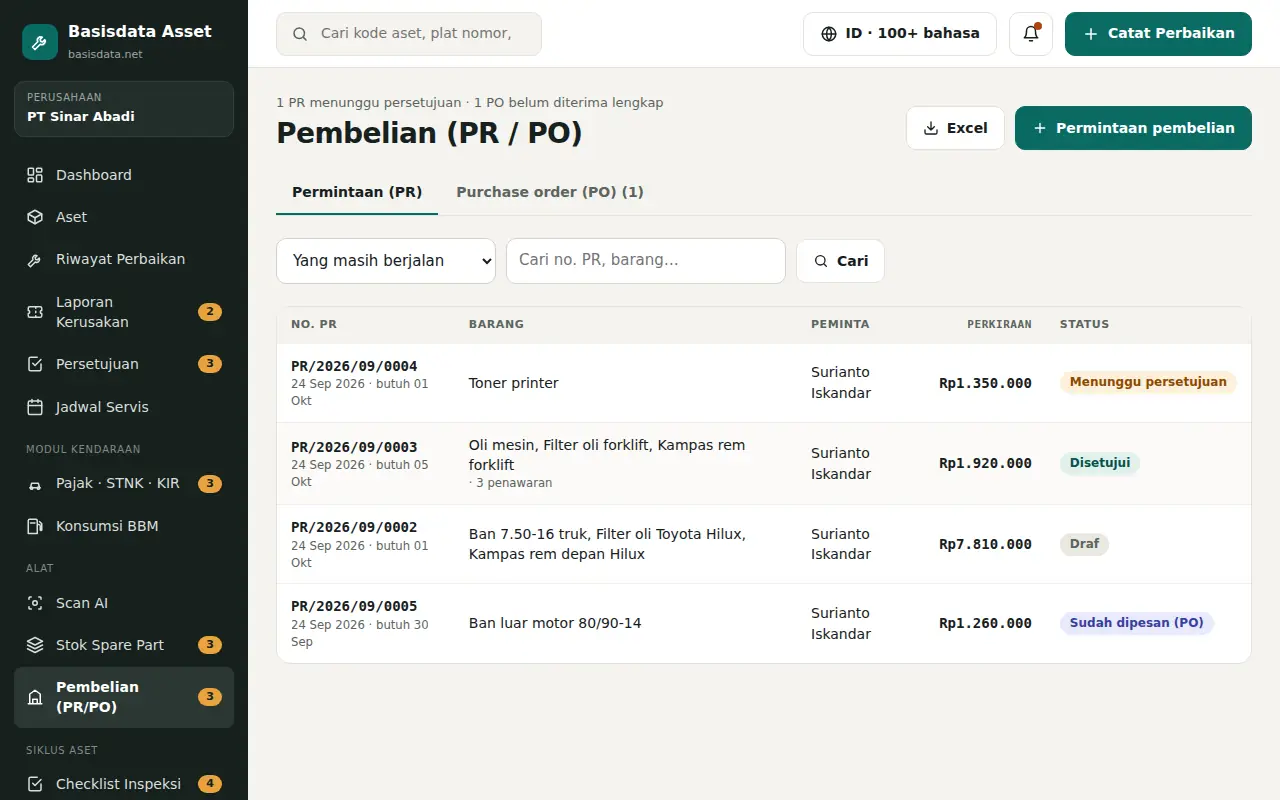
From purchase request to goods received, with spare part stock increasing automatically.
Steps
- Open Purchasing (PR/PO) → Purchase request. Pick items from the spare parts list or type other items.
- Click Submit. A manager approves within their role's limit. Without the approval module, the PR is approved directly.
- Record quotes from 2–3 vendors. The cheapest price per item is marked green.
- Click Choose → PO, print the PO and send it to the vendor.
- When goods arrive, fill in Receive goods (partial is fine). Spare part stock increases automatically.
- Stock below minimum? Click Create PR automatically, or let the system draft a PR every day.
Asset loans & warranties
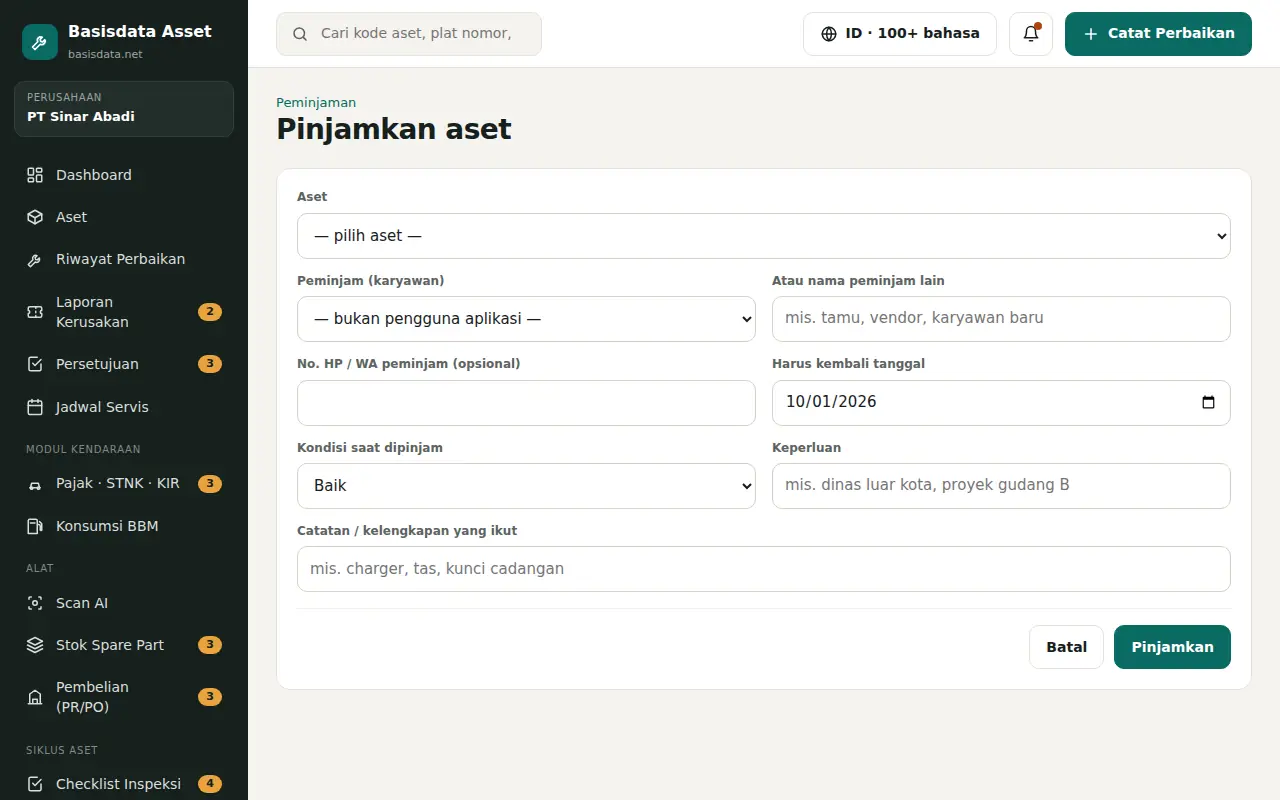
Track who borrowed what until when, plus warranty periods and service contracts.
Steps
- Loans → Lend an asset: choose the asset, borrower, due date and condition.
- Overdue assets appear on the Dashboard and get reminders.
- On return, click Check in. If damaged, a fault report can be created at the same time.
- Warranties: record the provider, end date and claims. Reminders go out 60 days before expiry.
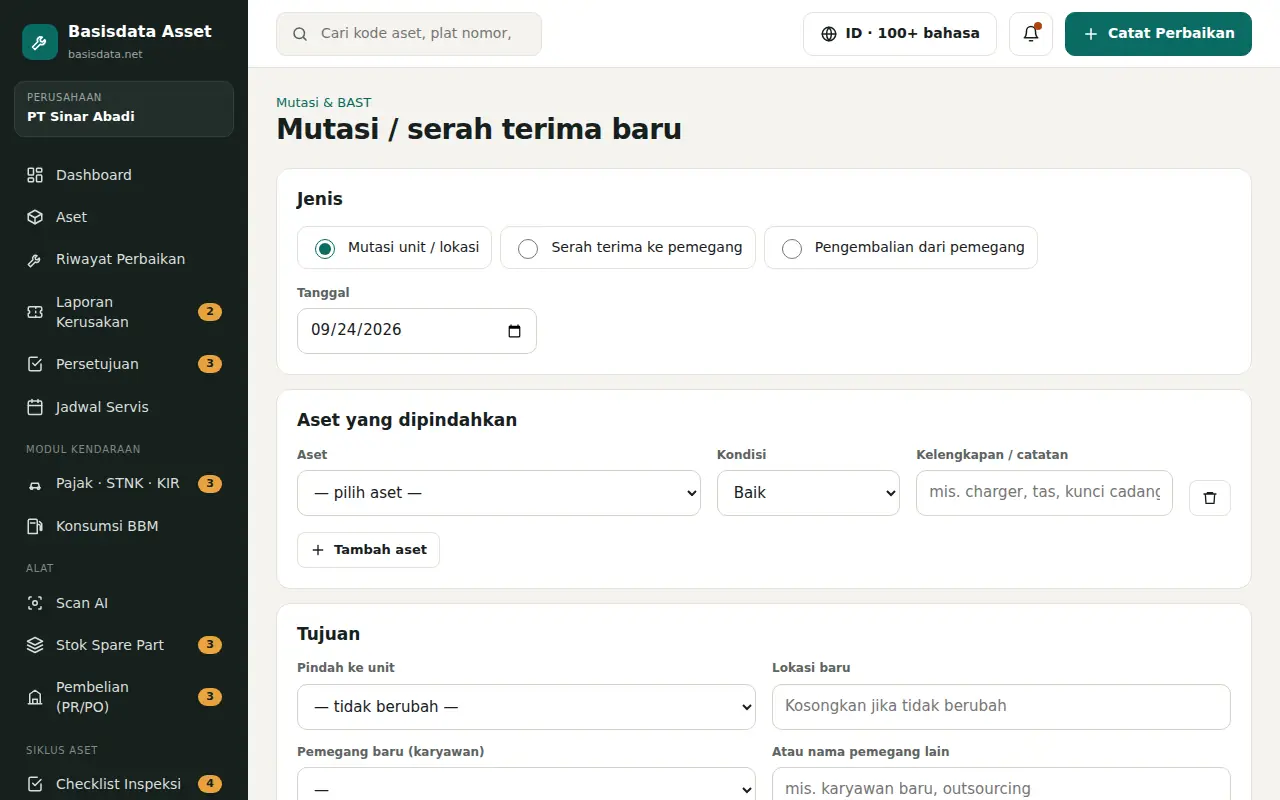
Asset transfers & digital handover
Move unit, location or holder with a handover document signed on a phone.
Steps
- Open Transfers & Handover → Transfer / handover, or the Transfer button on an asset page.
- Choose the type: unit/location transfer, handover to a holder, or return. One document can hold many assets.
- Enter the destination and the names of the first party, second party and an optional witness.
- Sign on screen, or send the link via WhatsApp so the recipient signs on their phone without logging in.
- Once everyone has signed, the asset's unit, location and holder update automatically. Print or save as PDF.
Asset audits with QR scanning
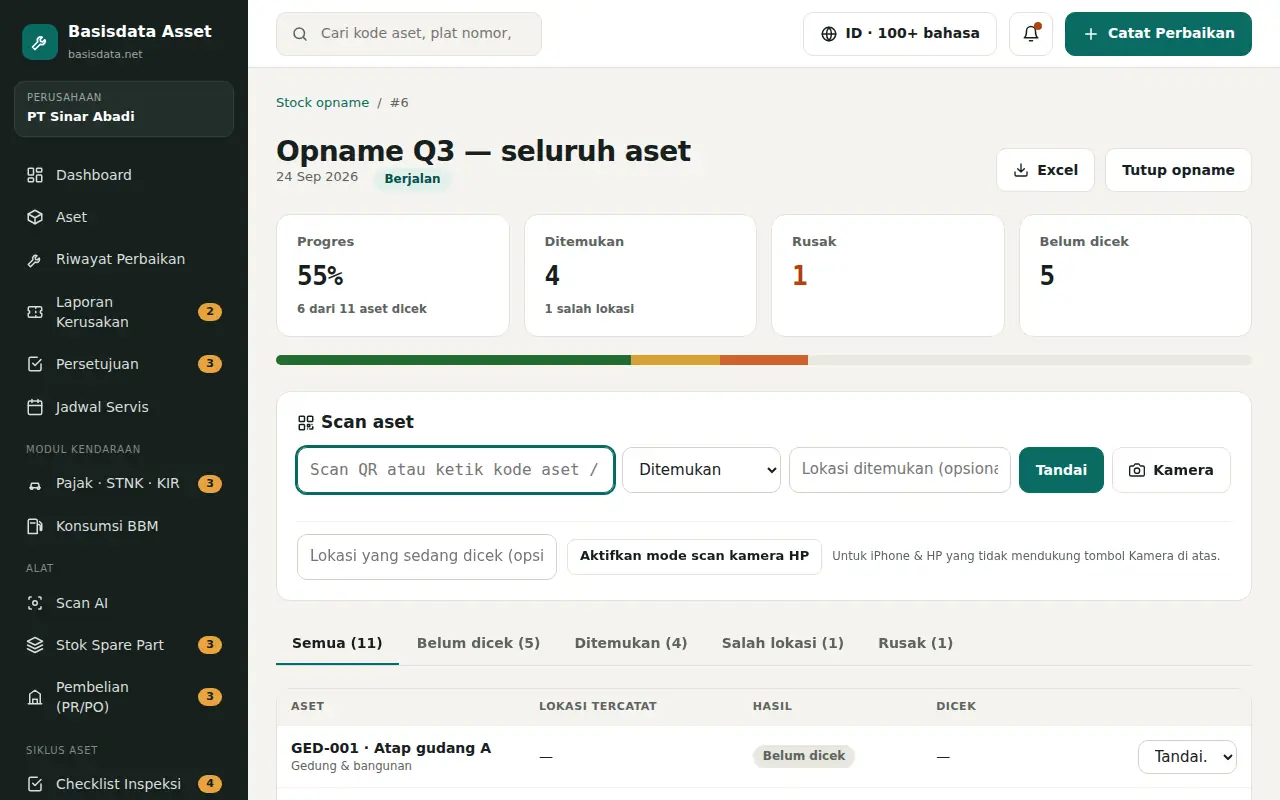
Count assets physically with a phone camera. Anything not found is marked missing automatically.
Steps
- Open Asset Audit → create a session for all assets, one unit, or one group.
- Walk around scanning QR stickers, or type the asset code / plate number.
- Mark the condition: found, damaged or wrong location.
- Click Close audit. Unchecked assets are marked missing, and the results can be applied to asset data.
Depreciation & book value
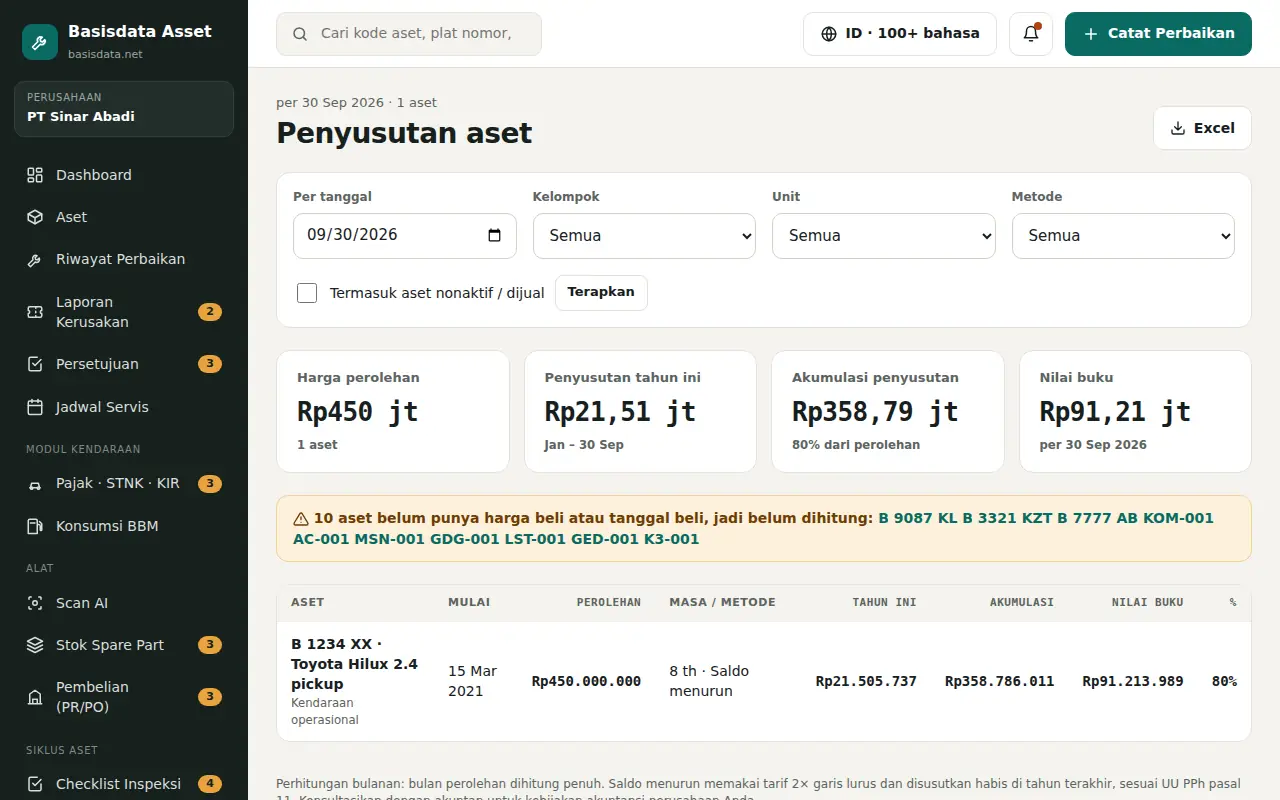
Asset book value is calculated automatically by tax asset class.
Steps
- Enter the purchase price and purchase date on the asset. That is enough to start.
- Default: straight line, useful life by asset class. You can switch an asset to declining balance.
- The Depreciation menu: cost, this year's depreciation, accumulated and book value as of any date.
- Download Excel for accounting. The asset page shows a yearly depreciation schedule.
Analytics & cost reports
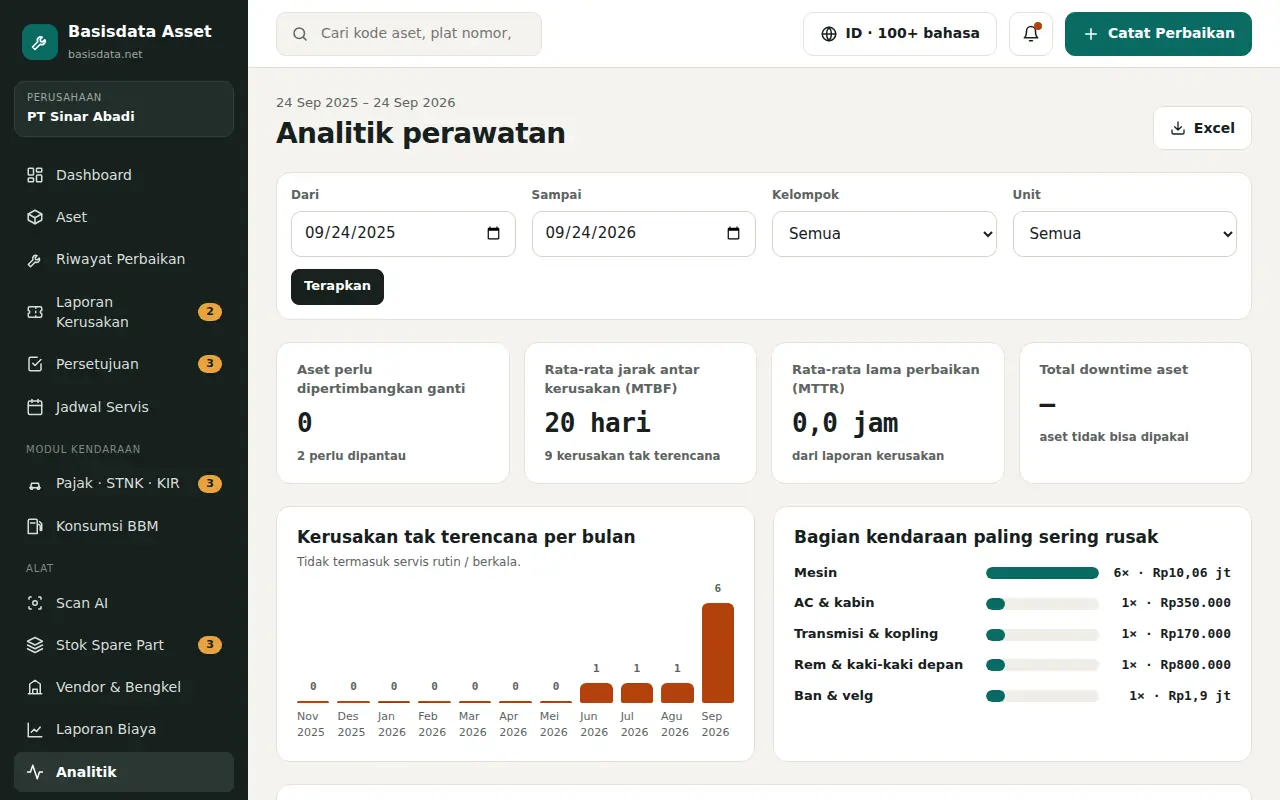
MTBF, downtime, cost per km and replacement advice. Export to Excel & PDF.
Steps
- Analytics: set the date range, group and unit, then click Apply.
- See assets worth replacing, MTBF, MTTR and total downtime.
- The per-asset table is sortable — click a column header.
- Cost Reports: cost per month, group and vendor; download Excel or PDF.
Technician KPI & downtime
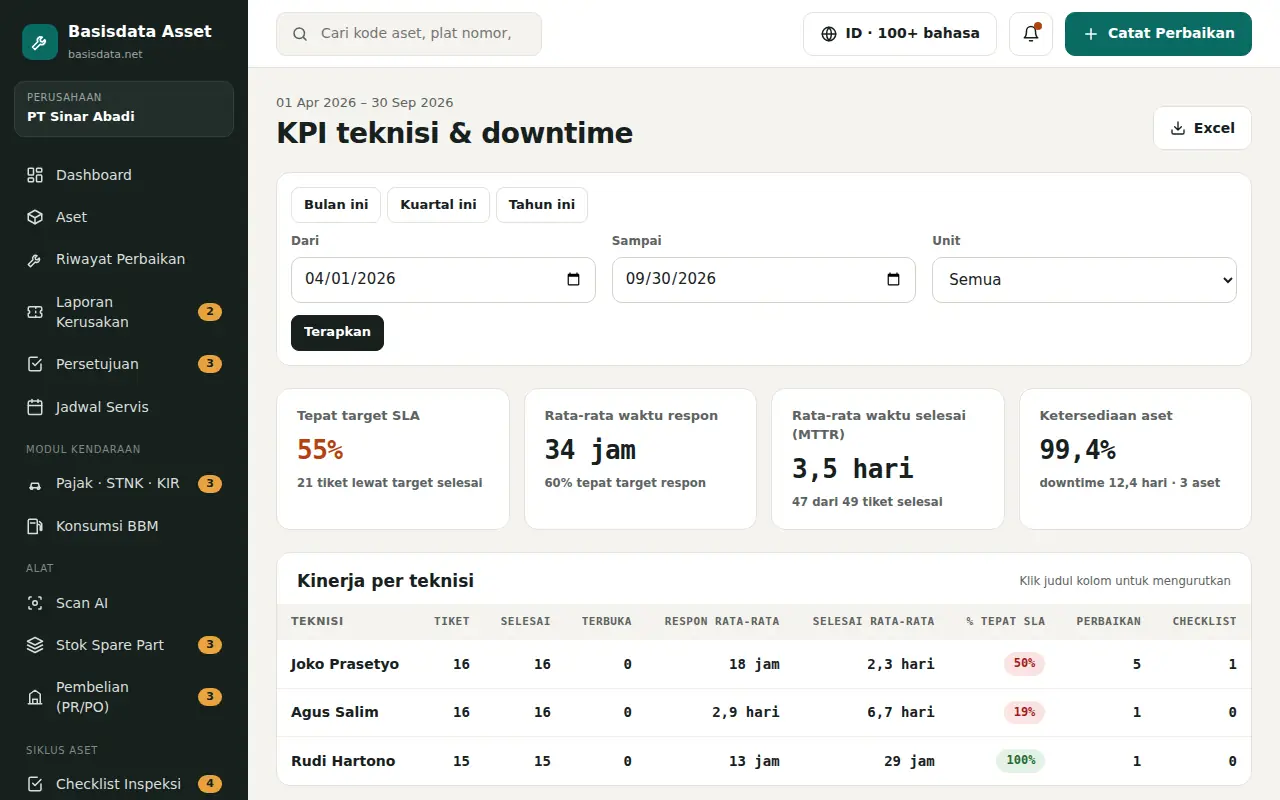
Measure response speed, repair time, SLA targets and asset availability.
Steps
- Open Technician KPI. Choose this month, quarter or year.
- Top cards: % within SLA, average response, average resolution (MTTR) and asset availability.
- The Performance per technician table can be sorted by clicking a column header.
- Tickets past their target appear at the top so they get handled quickly.
- Set response and resolution targets per priority under Set SLA targets.
Invite your team via link & WhatsApp
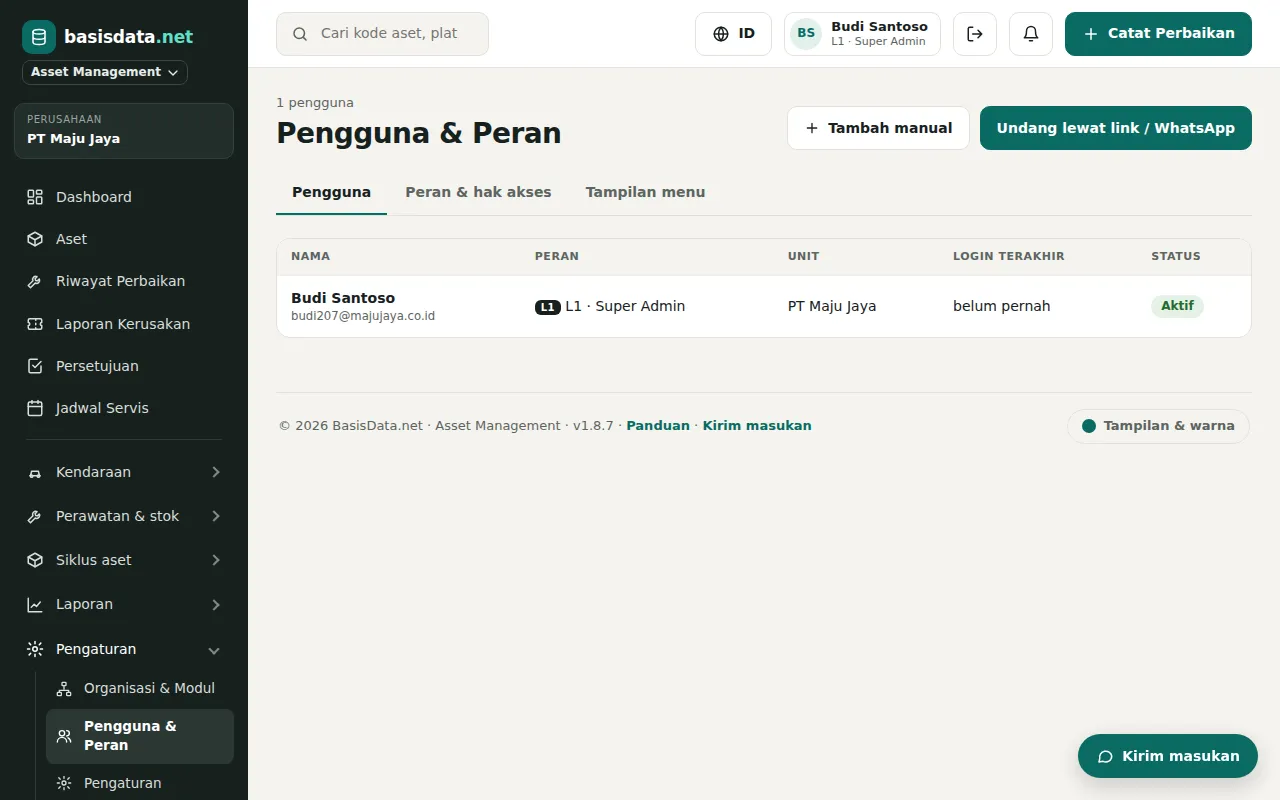
No need to create accounts one by one — send an invite link and your team joins by themselves.
Steps
- Open Users & Roles, click Invite via link / WhatsApp.
- Pick a role (e.g. Technician / Driver), then click Create invite link. The link is valid for 7 days.
- Send it via WhatsApp, copy the link, or send it to several emails at once.
- Recipients just enter a name, email & password (or Google) and are signed in. You get a notification email.
- Links can be disabled anytime. Use Invite other companies to share the app with business partners.
Organisation, users & modules
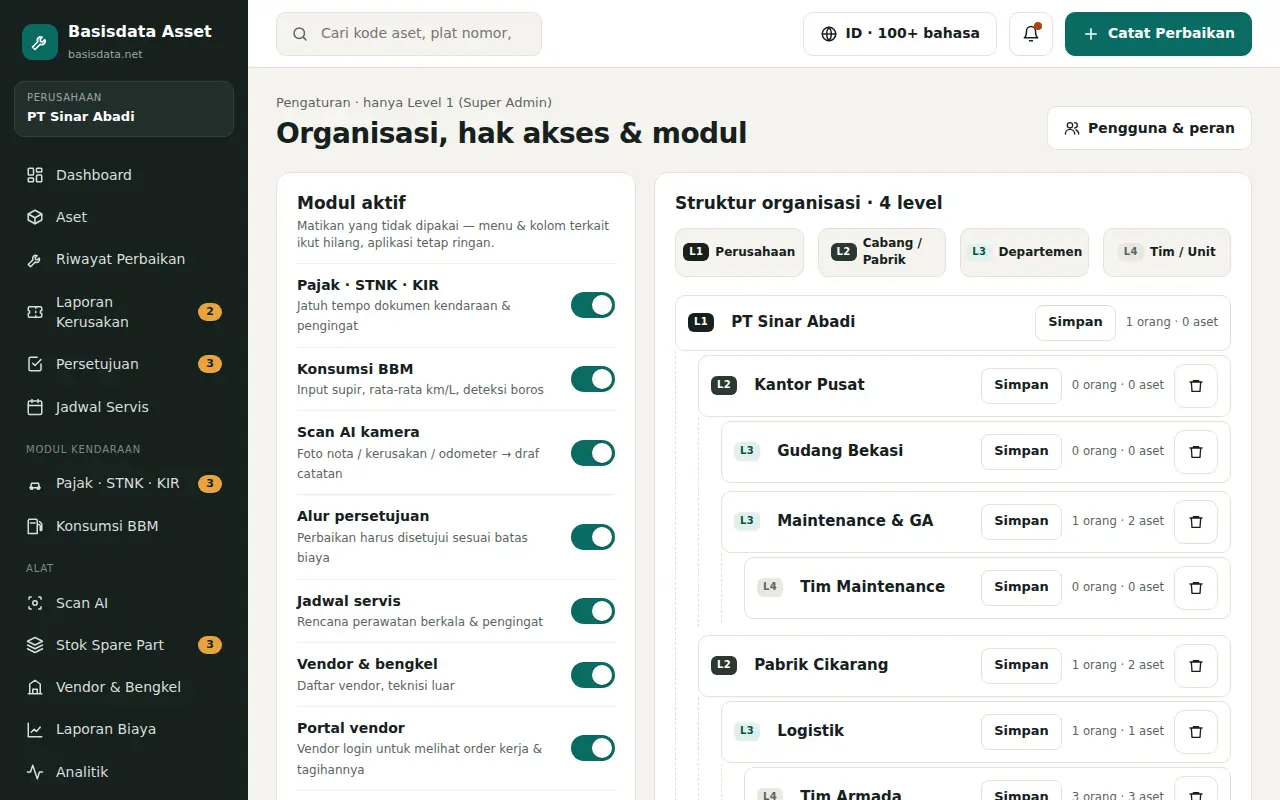
4-level structure, role-based access and modules you can switch on/off.
Steps
- Organisation: build Company → Branch/Plant → Department → Team/Unit.
- Switch on only the modules you use; inactive menus are hidden.
- Starter modules follow the team size chosen at sign-up (1–10 / 11–100 / over 100) — just turn on others when needed.
- Asset lifecycle modules (checklists, loans, warranties, audits, depreciation, transfers, purchasing, KPI) can each be switched on or off.
- Users: add users, choose a role (L1–L4 or Vendor) and their unit.
- The Roles & permissions tab controls: view, log, approve, manage assets, reports.
- The Menu display tab: hide specific menus per role so technicians & drivers only see what they use.
- Settings: company details, AI API key and email / WhatsApp notifications.
Install on your phone & change language
Use it like an app on Android & iPhone, even with a weak signal.
Steps
- Android (Chrome): open the site → ⋮ menu → Add to Home screen / Install app.
- iPhone (Safari): open the site → Share button → Add to Home Screen.
- The BasedOnData.net · Asset Management icon appears on your home screen and opens full-screen like an app.
- Change language with the 🌐 button at the top: Indonesian, English, or 100+ languages via Google Translate.